

Codex MCP Setup: Add an MCP Server to the Codex CLI and IDE Extension
 Abdullah Enes Gules9 min read
MCP (Model Context Protocol) is the interface that allows Codex to use tools. Codex can write code using only knowledge encoded into its model from training, but when a task requires knowledge outside of what it’s trained on (such as the current API of the library you installed last week), Codex needs a tool to fetch that information. An MCP server describes what its tools can do, and Codex calls them during a task.
We added Context7, our documentation MCP server, to a fresh Codex install using both the codex mcp add command and by adding it to ~/.codex/config.toml directly, and we purposefully made mistakes in the configuration to collect the error messages Codex would surface.
How do I add an MCP server to Codex?
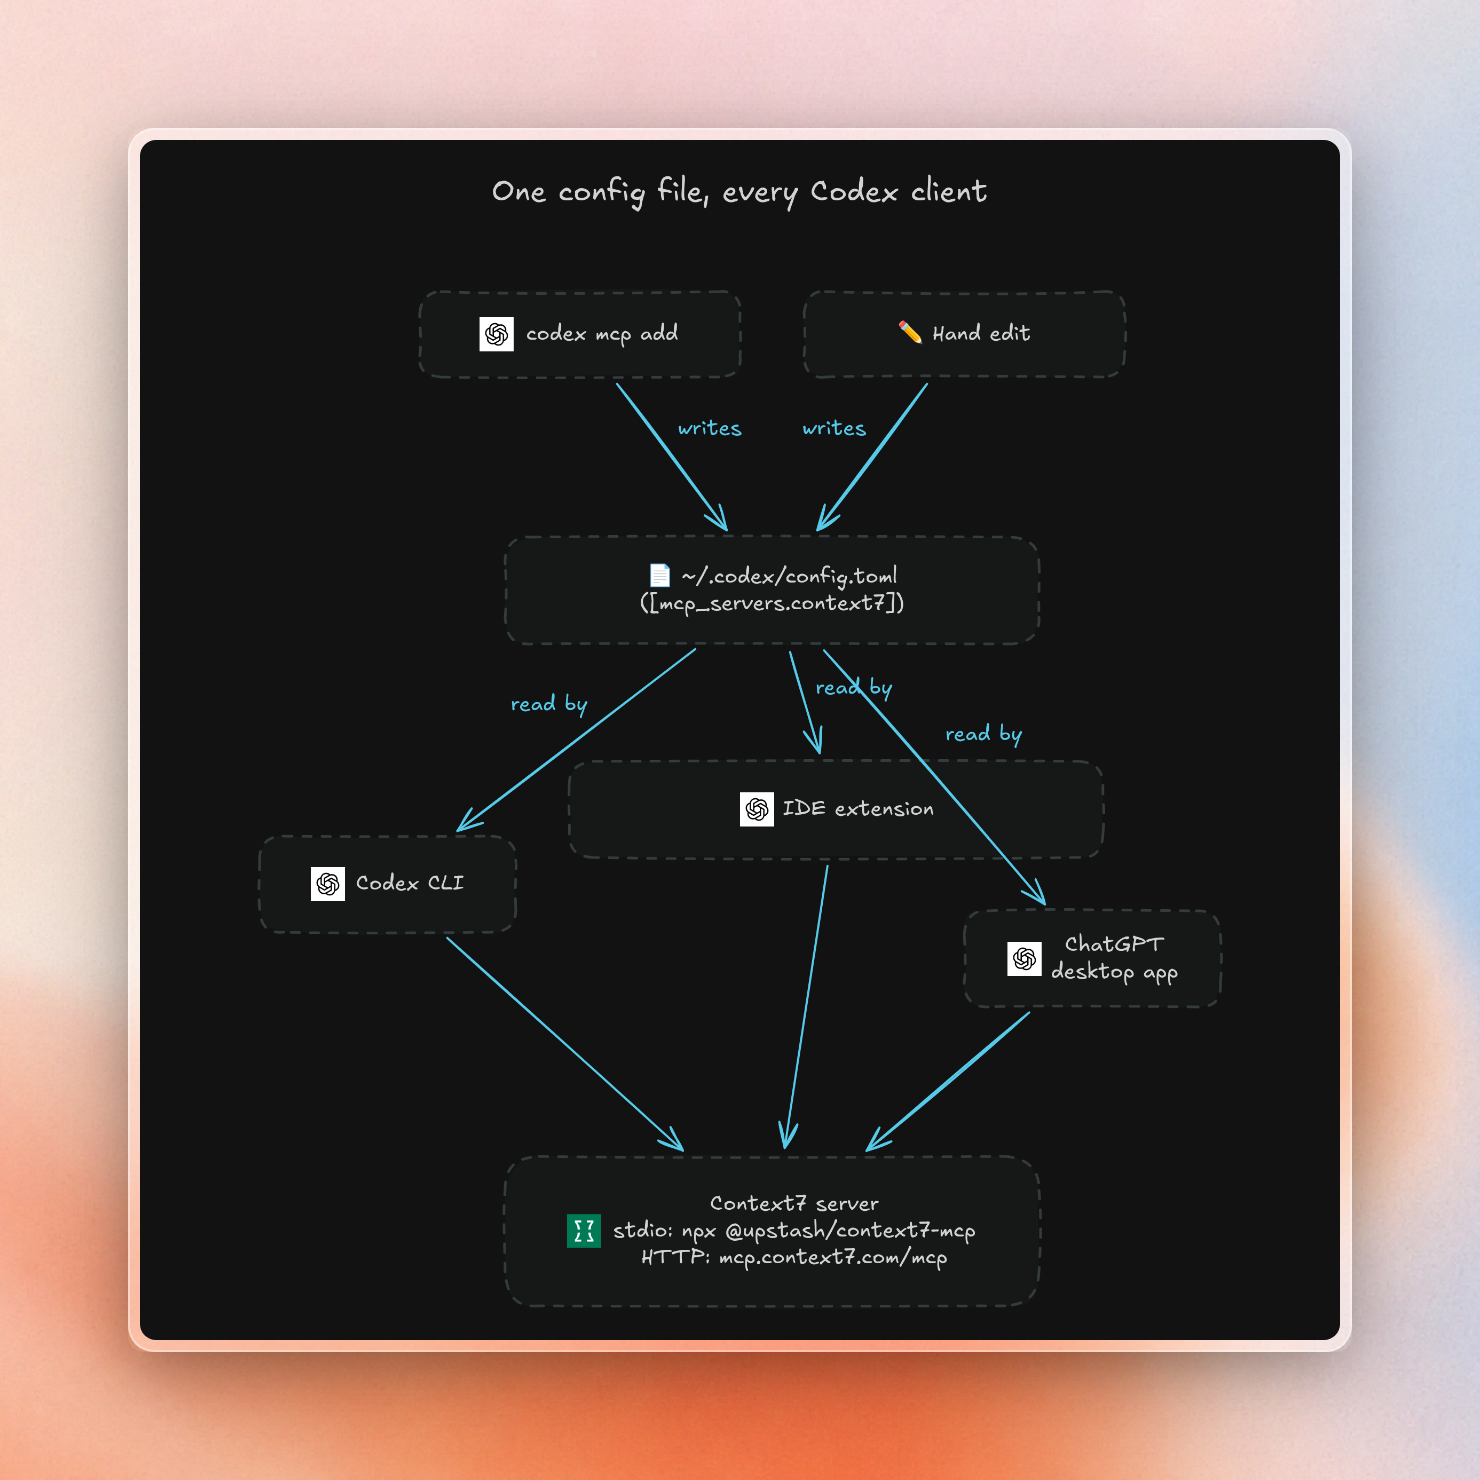
Add an MCP server via codex mcp add <name> -- <command> (local) or codex mcp add <name> --url <url> (remote). Codex persists the server in ~/.codex/config.toml, which the Codex CLI, IDE extension and ChatGPT desktop app all read.
You can also create the [mcp_servers.<name>] table in that file directly. Or, add a project-specific .codex/config.toml (which Codex will only read for trusted projects). Either way, once added, the server will be available across all Codex clients on that machine.
Add a local stdio server with codex mcp add
A stdio server is a program Codex starts on your own machine and talks to over standard input and output. Context7's server ships as an npm package, so npx -y @upstash/context7-mcp starts it. Everything after the -- is the command Codex runs:
$ codex mcp add context7 -- npx -y @upstash/context7-mcpAdded global MCP server 'context7'.Codex wrote this table to ~/.codex/config.toml:
[mcp_servers.context7]
command = "npx"
args = ["-y", "@upstash/context7-mcp"]
Context7 also works with no key. You can also create a key in the Context7 dashboard and then pass it as an environment variable (as shown below) to use your account's rate limits.
Some other commands to control the servers are:
codex mcp list: Lists all servers and the status + auth infocodex mcp get context7: Outputs full server config, hiding secret values as*****codex mcp remove context7: Removes server from file
Add a remote streamable HTTP server
A remote server runs on someone else's machine, and Codex connects to its URL over streamable HTTP. Nothing gets installed locally. Pass --url instead of a command. When the server takes an API key, --bearer-token-env-var names the environment variable that holds it:
$ codex mcp add context7 --url https://mcp.context7.com/mcp --bearer-token-env-var CONTEXT7_API_KEYThe table it writes holds the variable's name, never the key itself:
[mcp_servers.context7]
url = "https://mcp.context7.com/mcp"
bearer_token_env_var = "CONTEXT7_API_KEY"
This file can still be committed and shared without any worries, because the actual environment variable must be set in the shell that runs Codex. Codex reads it when starting a session and provides it in the Authorization: Bearer header.
Some servers support OAuth, and then you need no key at all. Context7 serves an OAuth endpoint at /mcp/oauth. When you add a URL like that, Codex detects OAuth support and starts the sign-in right away:
$ codex mcp add context7 --url https://mcp.context7.com/mcp/oauthAdded global MCP server 'context7'.
Detected OAuth support. Starting OAuth flow…
Authorize `context7` by opening this URL in your browser:
https://clerk.context7.com/oauth/authorize?response_type=code&client_id=...Codex will launch that URL in your browser, where you sign in; it then stores the token. To sign in again, run codex mcp login context7. If there is no browser on the machine, codex mcp login context7 --no-browser will print the URL. Open that URL on any device, sign in, and paste the full redirect URL back into the terminal, even if the browser cannot load that page. To remove the token, run codex mcp logout context7.
The [mcp_servers] table in config.toml
Every server is one [mcp_servers.<name>] table, and the name is how you refer to it in every codex mcp command. A stdio table needs command, and an HTTP table needs url. These are the keys Codex reads:
This is the Context7 table we use, with a longer startup timeout and only its two tools allowed:
[mcp_servers.context7]
command = "npx"
args = ["-y", "@upstash/context7-mcp"]
env_vars = ["CONTEXT7_API_KEY"]
startup_timeout_sec = 20
tool_timeout_sec = 60
enabled_tools = ["resolve-library-id", "query-docs"]
20 seconds gives us some buffer over the default 10. The first time the command runs it downloads the package. In our sandbox it took npx around 6 seconds to start the server when it already had the package cached.
Pass API keys and environment variables
A stdio server does not get a copy of your shell's environment. We tested this with a fake server that only writes the names of its environment variables to a file:
[mcp_servers.envdump]
command = "sh"
args = ["-c", "env | cut -d= -f1 | sort > /workspace/home/envdump.txt; sleep 2"]
env_vars = ["FORWARDED_ONE"]
env = { SET_IN_TOML = "x" }
We exported FORWARDED_ONE and NOT_FORWARDED in the shell, started Codex, and read the file:
CARGO_HTTP_CAINFO CURL_CA_BUNDLE FORWARDED_ONE GIT_SSL_CAINFO HOME LANG LC_ALL NODE_EXTRA_CA_CERTS NPM_CONFIG_CAFILE PATH PIP_CERT PWD REQUESTS_CA_BUNDLE SET_IN_TOML SSL_CERT_FILENOT_FORWARDED is missing. The server ended up with a small set of defaults (HOME, PATH, etc.) and the variables mentioned in the table. An API key exported in .zshrc won't be sent to the server unless you explicitly tell the table to do so.
This can be done with either:
env, which serializes the value intoconfig.toml. That's whatcodex mcp add --env CONTEXT7_API_KEY=ctx7sk-example -- npx -y @upstash/context7-mcpdoes, with the key in plain text under[mcp_servers.context7.env].env_vars, which lists just the variable names. Codex then copies the values from the shell it is started from. This keeps the value out of the file.
Context7's server reads its key from CONTEXT7_API_KEY or from an --api-key argument. With env_vars = ["CONTEXT7_API_KEY"], codex mcp get context7 shows the key as forwarded and hidden:
context7
  enabled: true
  enabled_tools: resolve-library-id, query-docs
  transport: stdio
  command: npx
  args: -y @upstash/context7-mcp
  cwd: -
  env: CONTEXT7_API_KEY=*****
  startup_timeout_sec: 20
  tool_timeout_sec: 60
  remove: codex mcp remove context7
For HTTP servers, similar functionality exists with different keys. Use bearer_token_env_var for a bearer token and env_http_headers to map other headers to variables.
Add an MCP server in the Codex IDE extension
The Codex extension for VS Code and other editors has its own form to do this, which also writes to ~/.codex/config.toml (so servers you added using codex mcp add are available on its list, too). From your editor:
- In the Codex panel, open the gear menu, then select MCP servers.
- Select Add server.
- Provide a name, choose STDIO or Streamable HTTP, then enter the command or the URL.
- Save the server, then select Restart extension.
To add a server in the ChatGPT desktop app, select Settings and then select MCP servers, where you'll find the same form as in the IDE extension with a Restart button to complete the process. This panel also shows which servers require OAuth, with Authenticate to start the sign-in.
Check that the server works
codex mcp list is the first check. It reads the config and prints stdio and HTTP servers in two tables:
Name      Command  Args                      Env  Cwd  Status   Auth
context7  npx      -y @upstash/context7-mcp  -    -    enabled  Unsupported

Name             Url                           Bearer Token Env Var  Status   Auth
context7-remote  https://mcp.context7.com/mcp  CONTEXT7_API_KEY      enabled  Bearer token
A server in this list is configured. That does not mean it starts. Inside the interactive codex terminal UI, /mcp shows the servers that are running in your session. For a scripted check, ask codex exec to use the server and watch for mcp: lines in its output:
$ codex exec "Use context7 to find how to set a TTL on a key with @upstash/redis. Answer with one line of TypeScript."mcp: context7/resolve-library-id started
mcp: context7/resolve-library-id (completed)
mcp: context7/query-docs started
mcp: context7/query-docs (completed)
codex
`await redis.expire("mykey", 10);`A broken server is easy to miss. In our runs, a server with a wrong command and a server with a missing token both failed with no message, and codex exec answered the prompt without them. Setting required = true on a server makes Codex stop and print the reason instead:
Error: thread/start: thread/start failed: error creating thread: Fatal error: Failed to initialize session: required MCP servers failed to initialize: missingtoken: Environment variable NOT_SET_TOKEN for MCP server 'missingtoken' is not set (code -32603)You can set required with codex exec -c mcp_servers.context7.required=true "..." to enable it just for one run without editing the file.
Common Codex MCP errors and fixes
We wrote each of these mistakes into a config file and ran codex mcp list or codex exec against it. The first column is what Codex printed:
With that typo, Codex failed silently: it skipped the [mcp-servers] table and loaded the rest of the file.
npx servers can have two additional problems:
- If the server times out on start, increase
startup_timeout_secto 40 and try again. - On Windows,
npxneedsSystemRootandAPPDATA, which some Codex setups don’t provide. Set thecommandto the full path ofnpx.cmdand the two variables in the server’senvtable.
Set up Context7 in Codex with one command
For Context7 there is a shorter path than writing the table by hand. This command signs you in, creates an API key, and writes the server into ~/.codex/config.toml:
$ npx ctx7 setup --codexAuthentication happens over a device code, which makes it work via SSH or on systems that do not have a web browser. Setup lets you use Context7 as MCP or as a CLI tool. It will write instructions to use Context7 in AGENTS.md.
Context7 is also a Codex plugin. The plugin connects to the hosted server and adds a skill that looks up docs when you ask about a library:
$ codex plugin marketplace add upstash/context7
$ codex plugin add context7@context7-marketplace
Added marketplace `context7-marketplace` from https://github.com/upstash/context7.git.
Added plugin `context7` from marketplace `context7-marketplace`.See the all clients page for other editors and agents. After installing the plugin, create a new Codex thread (this makes sure that codex loads the skills and tools of the plugin). Now you can use a prompt like "use context7 to show me how to set up a proxy in Next.js 16" and codex should use context7 to retrieve the latest docs rather than using the training data.